Contenu
- Preparing the Scooter
- Step 1
- Step 2
- Using a Gasoline Engine
- Step 1
- Step 2
- Step 3
- Using an Electric Motor
- Step 1
- Step 2
- Step 3
- Step 4
- Tip
- Warning
- Items you will need

For those looking to save some money on short-distance transportation, you may consider leaving the car in the garage and taking a motorized scooter instead. While the term "motorized scooter" can be used to mean several things, it usually refers to the traditional scooter design that instead of leg power, is being propelled by a gasoline or electric motor.
While the theory behind this concept is relatively simple, putting it into practice takes time, skill, and some creativity to fabricate parts, making this a moderately challenging task to accomplish.
This guide will walk you though modifying a regular scooter to be powered by either gasoline or electricity.
Preparing the Scooter
Step 1
Pick out your scooter. While any scooter will work in theory, you should choose a model that is sturdy, is constructed using solid parts, and offers strong connections between the various pieces. Since the scooter will have more stress placed upon it than what was intentionally intended, the overall build needs to be of solid quality to ensure a safe finished product. Metal scooters, such as those made from aluminum, are the best for this task.
Step 2
Decide upon a gasoline or electric motor. Gasoline systems generally weigh less and provide for easy refueling options at any gas station but are noisy, cannot be used in many areas and are messy to refuel. Electric motors, on the other hand, are silent, produce no emissions, do not involve the use of messy liquids, and can be used in almost any public place. On the downside, they require the use of heavy batteries, cant go very far on a single charge and require many hours to regain power, so they cant simply be refueled at a station when they run out of energy.
Attach a sprocket to the side of the wheel. The way in which this is accomplished will vary from one scooter design to another, so you may have to be creative in coming up with solutions for your individual application. In many cases a sprocket from a dirt bike or similar device can be salvaged and put to use for this application. You may have to install a slightly thinner wheel and tire to allow room for the sprocket and chain clearance. At this point you are left with a chain that can be rotated by any motor to provide forward motion. All thats left is to decide what type of motor you wish to use and then install it.
Using a Gasoline Engine
Step 1
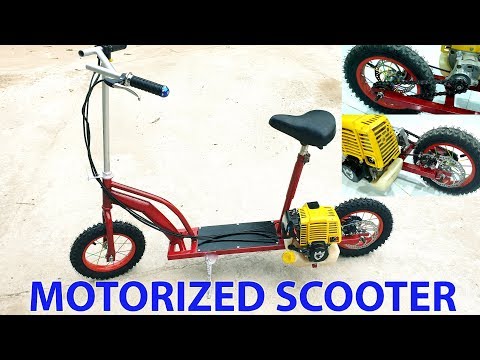
Source the engine from salvaged gasoline-powered equipment or from an engine kit. Online retailers such as eBay offer several different kits designed for various equipment that will be used on public roadways. These kits come with engines that are 49cc or less in displacement, making them perfect for use by the potential scooter commuter. Most kits will also come with some type of mounting system and a remote throttle control.
Step 2
Bolt the engine into place at the rear of your scooter. Using the engines mounting holes as a guideline, screw holes in the scooter with a drill bit that is slightly larger than the bolts which will be used. Mount the engine into place with the bolts. Place a vibration-dampening washer between the engine and the scooter itself, then a regular washer and a locking washer between the scooter and the nut. This will provide a secure mount that wont cause excess noise or vibration and wont shake loose over time.
Step 3
Secure the throttle control to the handlebars. A twist-handle operation throttle may be used, or any other basic system such as the one used on a lawnmower will work as well. Run the cable down the front bar, along the body of the scooter, and then to the engine. Use zip ties to keep the cable from moving while you are riding.
Test drive the scooter. Listen closely to the engine to make sure everything is running right. If the motor is new, it may require an oil change after the first few hours of usage to remove any spare metal that is left from the manufacturing process. Also pay close attention to the condition of the tires and brakes, since more stress is going to be placed on them due to higher speeds.
Using an Electric Motor
Step 1
Electric motors can be installed either separately or as a kit. For an electric motor kit, check your local hardware and tool stores. Boxed kits consist of all new components, including the motor itself and an electric controller. For optimal battery compatibility, the motor must be D/C and operate at either 6v or 12v. Check the size of the motor to make sure it will fit on the scooter. The larger the motor is, the more power it will provide, but it will also drain the batteries faster than a more efficient motor.
Step 2
Mount the motor into place at the back of the scooter. Double-check that the location of the output shaft will provide adequate clearance for the chain to reach the rear sprocket. In some cases, a riser made out of painted wood or scrap metal may have to be used to place the shaft at the proper height. Drill through the base of the scooter itself, and use bolts to secure the motor into place.
Step 3
Position the battery (or batteries) just in front of the electric motor. Secure them into place using premade brackets, or make your own using metal L-shaped shelf brackets. Secure one end of the bracket to the battery, and the other end to the scooter. If there is no place to secure the brackets to the battery, position one L-shaped bracket on each side of the battery to prevent it from sliding in either direction.
Step 4
Run the wiring for your electronics. The batterys positive and negative terminals should be connected to the corresponding terminals on the motor itself. The motors electronic controller should be mounted on the handle bar, giving you easy access to it while driving. Secure any loose wiring to the scooters frame using wire clips or plastic zip ties.
Take your scooter for a test ride. Check for any unusual vibrations or any functions that seem out of place. Make sure the open chain does not pose a danger to your feet, legs, or any parts of the scooter or drive system (such as unsecured wiring). Before taking the scooter up to speed, check the tires to make sure they are rated for your intended speed. Test the brakes to make sure they are fully prepared to bring you to a quick halt. Upgrading to a larger brake size may be necessary.
Tip
- To ensure your scooter is legal to be used on public roads, only use a gasoline engine of less than 50cc displacement. Consider installing a speedometer to measure how fast you are moving. For electric-powered scooters, consider placing a voltmeter on the system to judge how much power is remaining.
Warning
- Always wear proper protective equipment such as a helmet, knee pads and elbow pads.
Items you will need
- Gasoline motor kit
- Electric motor kit
- Battery
- Wheel sprocket
- Standard tools


