
Contenu
- Vehicle Preparation
- Step 1
- Step 2
- Brake Removal
- Step 1
- Step 2
- Brake Installation
- Step 1
- Step 2
- Step 3
- Warnings
- Items you will need
Changing the disc brakes on your Kia Optima is an important part of vehicle maintenance. The disc brakes on your Optima should be inspected at least once a year, or as recommended in your Optimas owners manual. Worn brake pads should be replaced while the brake rotors should be inspected for surface wear and warping, and replaced when necessary.
Vehicle Preparation
Step 1
Park the vehicle on level ground and turn off its ignition. Open and secure the hood. Disconnect the negative terminal cable from the battery. Open the brake master cylinder reservoir and use a turkey baster to remove half of the brake fluid from the reservoir. Place the used fluid in an air-tight container and discard it properly. Close the reservoir.
Step 2
Loosen the wheel lugs, using a lug wrench. Raise the vehicle with a floor jack and secure it with jack stands.
Remove the wheel lugs with the lug wrench and remove the wheel.
Brake Removal
Step 1
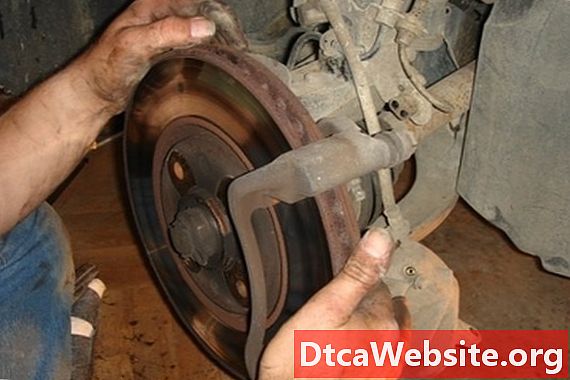
Remove the two bolts holding the caliper to its mounting bracket with a ratchet and socket. Lift the caliper off of the brake disc and mounting bracket. Suspend the caliper on a sturdy suspension component with a bungee cord to avoid placing stress on the brake line.
Step 2
Slide the brake pads off of the mounting bracket. Place an old brake pad over the caliper piston and use a C-clamp to push the piston in the caliper.
Remove the two bolts holding the caliper mounting bracket to the axle, using a ratchet and socket. Move the bracket out of the way of the brake rotor. Remove the cotter pin inside the spindle nut, using the needle-nose pliers. Remove the spindle nut, using a ratchet and socket. Slide the rotor off the axle, using a rubber mallet to tap the rotor free, if necessary.
Brake Installation
Step 1
Mount the new rotors on the axle. Reinstall the spindle nut and tighten it with a ratchet and socket, ensuring the hole for the cotter pin is exposed. Thread the cotter pin into the spindle nuts hole.
Step 2
Reinstall the caliper mounting bracket. Add a small amount of anti-squeal compound on the back of the new brake pads and place them on the mounting bracket. Lower the caliper over the brake pads and reinsert the retaining bolts. Tighten the bolts with a ratchet and socket.
Step 3
Repeat the procedure on the other wheels. Mount the wheels onto the axle and hand-tighten the lug nuts. Remove the jack stands and lower the Optima to the ground. Tighten the lug nuts with a lug wrench.
Open the brake master cylinder reservoir and refill it with fresh brake fluid. Close the reservoir when finished. Reconnect the negative terminal cable to the battery and close the hood. Start the vehicle and pump the brakes four to five times to set the new pads.
Warnings
- Do not allow brake fluid to come in contact with painted surfaces. Use water and a shop towel to clean spilled brake fluid, which can strip paint.
- Be cautious when working on raised vehicles. Ensure the floor jack and jack stands are rated for handling the weight of your vehicle.
Items you will need
- Brake fluid
- Brake pads
- Brake rotor
- Lug wrench
- Floor jack
- Jack stands
- Turkey baster
- C-clamp
- Ratchet and socket set
- Needle-nose pliers
- Anti-squeal compound


