Contenu

In the continuing effort to improve gas mileage auto makers have found inventive ways to reduce vehicle weight. Using new alloys, plastics and thinner materials is standard practice in newer cars. So too is the use of small gauge wiring and tiny horns that make nothing more than a pitiful beep, barely audible only a few feet away. Installing a new, more powerful horn solves the sound level problem but can damage the wires if a relay and a short length of new wiring isnt installed with the horn.
Step 1
Locate the original horn and disconnect the wire to it. With the vehicle key in the on position, depress the horn button and check for 12 volt power in the wire with a test light or multimeter. If 12 volts is not present when the horn button is depressed, use a continuity checker to test for continuity between this wire and the battery negative terminal.
Step 2
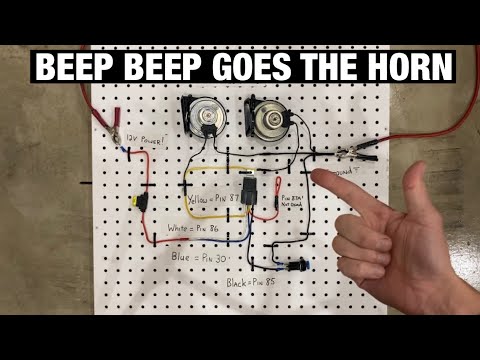
Connect this wire to the relay at terminal 85 if 12 volts was present in the wire. Connect terminal 86 to a metal part of the vehicle using a short piece of 16 gauge wire and solderless connectors.
Step 3
Connect the horn wire to terminal 86 and terminal 85 to terminal 30. Finding continuity between the horn wire and the vehicle ground requires wiring the relay differently.
Step 4
Mount the new horn and relay in a convenient location under the hood. Choose a location close to the battery to reduce the cost of the project by minimizing the amount of heavy gauge wire used.
Step 5
Connect a solderless ring terminal to one wire from the inline fuse holder and connect it to the positive terminal on the vehicle battery. Using a solderless butt connector and ten gauge wire, extend the other side of the fuse holder to the relay and connect to terminal 30 using the appropriate type of solderless connector, which will usually be a female spade connector.
Using a length of ten gauge wire and the appropriate solderless connectors, connect terminal 87 on the relay to the horn. If the horn has two connectors the second connector is connected to a metal part of the vehicle with ten gauge wire and solderless connectors.
Tip
- If no power or continuity to ground is found the horn switch is bad and must be replaced or a remote switch must be installed in a convenient location for the driver to reach. If this is necessary connect one terminal on the new switch to a metal part of the vehicle and follow the instruction for wiring the relay when the horn wire has continuity to the vehicle ground, installing a wire from the second terminal on the switch to terminal 86.
Warning
- Always disconnect the negative terminal of the vehicle battery before attempting any wiring in the vehicle. Recheck your wiring before reconnecting the battery when you have finished.
Items you will need
- Automotive primary wire
- Solderless terminals
- Crimping tool
- Automotive relay with four terminals
- Inline fuse holder with 20 amp fuse


