Contenu

When a boat sits in the water the exterior metal parts interact with each other to create a current similar to that of a very weak battery. These currents flow from one metal part to another; the current strength depends on what types of metals interact, along with the mineral content of the water itself. Boat metals consist of steel, copper, zinc and brass metal. Sacrificial anodes of zinc strategically placed on the boat help dissipate electrolysis to keep metal corrosion at bay. If the anodes have been placed and maintained properly, they prevent metal corrosion. Checking the electrolysis of your boat can prevent severe corrosion.
Step 1
Moor your boat to a dock that has little boat activity or traffic around it. This will isolate your craft from electrical disturbances in the environment.
Step 2
Place a downrigger wire in the water next to the side hull of your craft. The water depth should be about five or six feet. The wire should have a vinyl-covered weight with a snap connector on the end of it. You will not need a ground source for an outrigger wire. If you do not have such a wire, obtain thin steel braided wire and tie a weight on the end of it.
Step 3
Connect one end of the wire to a bonding ground source on your boat, like a rail or motor-mount bolt. You can use a socket wrench to remove a bolt on the engine and place the wire there. Turn off every electrical device on the boat. Start with the master battery switches, if you have them.
Step 4
Turn the ignition key off and double-check any component or appliance that runs directly off the battery. Turn all electrical switches to the "Off" position. Unhook any shore cable power feed.
Step 5
Set a multimeter gauge to the low volt setting, one that will measure a scale from zero to one volts. Connect the negative lead of the multimeter to the negative side of your battery, or to a ground source on the engine.
Step 6
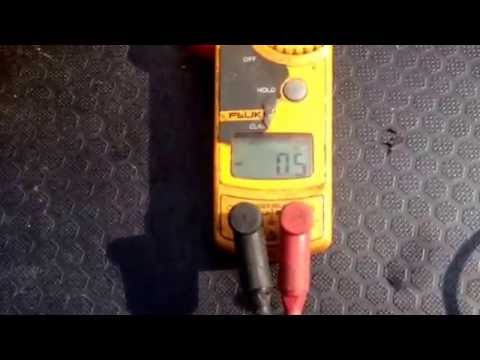
Place the positive lead of the multimeter on your downrigger wire arm or near the spool or on the positive lead of the single wire. The reading on the gauge should indicate 0.7 or 0.8 volts.
Step 7
Write down your initial reading. Now turn on your master battery switch and take another reading. Write it down. Your master battery switch reading should not differ from the initial reading by more than 0.05 volts. if it does, a problem lies with the master battery switch wiring. Turn on your bilge pump and look for a voltage change of no more than 0.05 volt change from your initial reading. A greater change will indicate a problem with the bilge pump through-hull fitting.
Start the engine and systematically turn on each appliance and component and record the individual readings. Any appliance or component that produces a reading greater than 0.05 volts from your initial reading indicates a problem with that specific component.
Tip
- If your multimeter measures below 0.500 volts, this usually indicates your zinc anodes are not making proper contact while immersed. You can clean the anodes with a wire brush to remove oxidation and film.
Items you will need
- Downrigger wire
- Weighted wire (if applicable)
- Socket set
- Ratchet wrench
- Multimeter
- Pen and paper


