
Contenu
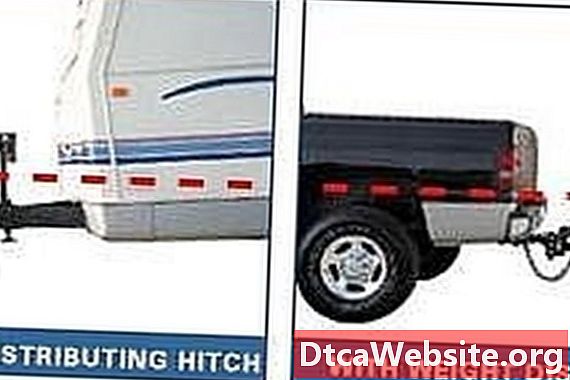
When a trailer is hitched to a tow vehicle, the tongue weight typically causes the rear of the tow vehicle to lower and the front to raise. The purpose of a weight distributing hitch is to remove excessive weight from the tow vehicles rear axle and distribute it to the front wheels and the trailer wheels.
Heres how to set this type of system up properly to ensure a safe towing experience.
Step 1
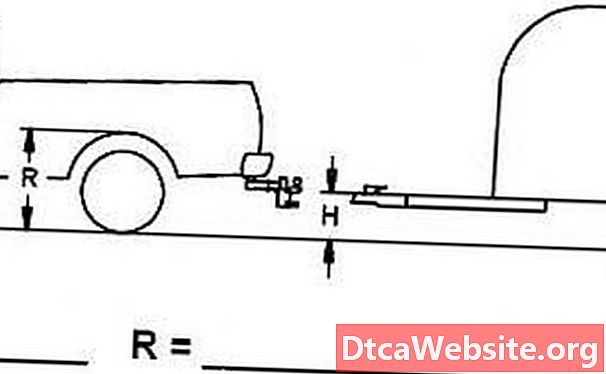
The first step is to take some simple measurements. This will help us during the adjustment steps. Start by lining up the tow vehicle and trailer on level ground, in a straight ahead position, with the trailer uncoupled. Measure and write down the uncoupled height at the front and rear wheel openings to the ground, and the level trailer coupler height (see image).
Step 2
Set the unloaded ball height on the tow vehicle hitch head about 1/2" to 1" lower than the trailer coupler measurement from Step 1. This can be accomplished by moving the hitch head up or down in the holes of the hitch shank. It may be necessary to flip the shank over to achieve the correct height (see image). The exact amount will depend on how stiff the suspension of your tow vehicle is.
Step 3
Next, lower the trailer coupler onto the hitch ball and close coupler latch. Using the tongue jack, raise the trailer coupler and the rear of the tow vehicle 3" at the ball.
Step 4
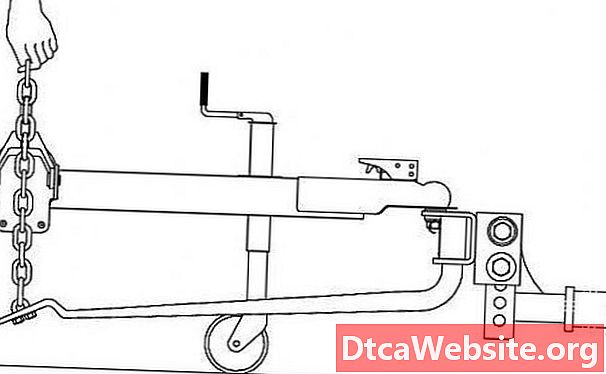
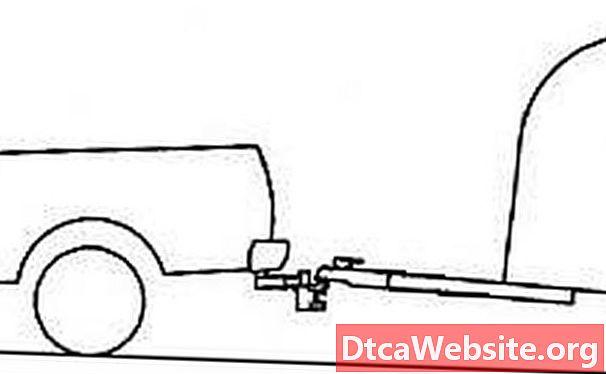
Insert the spring bars into hitch head sockets. With the lift unit (see image) in the raised position, pull straight up firmly on spring bar chain. Note which link is closest to chain hook. Countdown 2 links and that link will be used for hook up.
Step 5
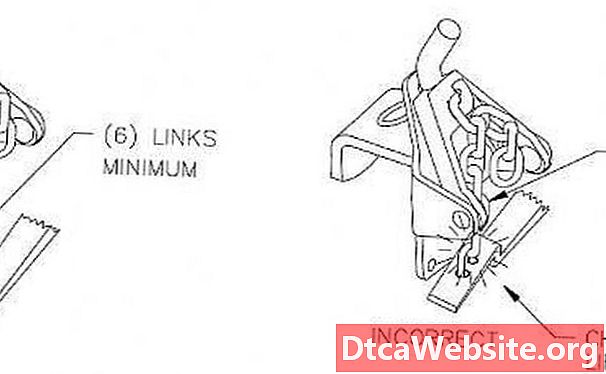
Attach the upper end of the chain link to lift unit hook, while allowing remaining free links to fall down to the outside of the trailer frame (see image). Swing the lift unit into position by pushing up on the lift unit hook with the lift handle. Ensure there are at least 6 links between the lift unit and the spring bar. This is necessary for proper operation of the spring bars during turns.
Step 6
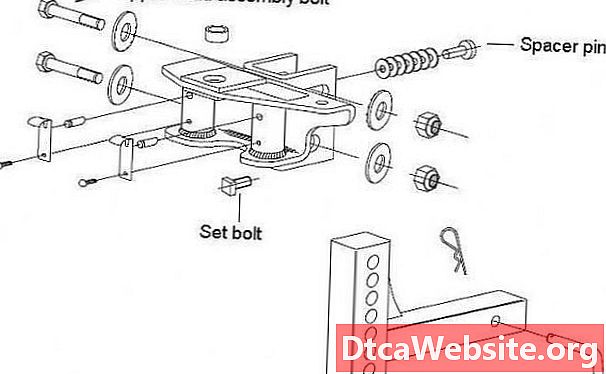
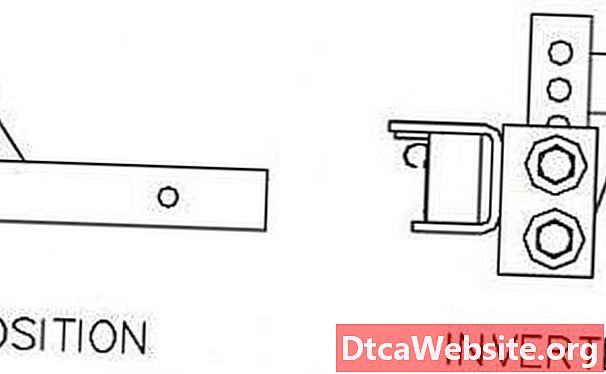
If there are less than 6 links between the lift unit and spring bar, the angle of the head assembly (the shank and the head) must be increased. To accomplish this, the trailer must be uncoupled and the upper bolt removed from the head assembly. Pivot the head assembly down and add a washer underneath the spacer pin, located in the channel between the head unit and the shank (see image). Reinstall the upper head assembly bolt but dont tighten it yet. Tighten the angle set bolt to 50 lb. ft. Now tighten the upper head assembly bolt to 250 lb. ft.
Step 7
Follow Steps 3, 4, and 5 again, checking to make sure there are at least 6 links between the lift unit and the spring bar. Follow Step 6 again if you still cannot obtain the 6 links necessary and repeat this step again. Otherwise, continue to Step 8.
Step 8
If everything is set up correctly, the tow vehicle will settle down evenly, front and rear. Compare the coupled height measurements at the front and rear wheel openings to the ground with the measurements taken during Step 1. If front settles lower than rear, increase the number of chain links between lift unit and spring bar. If rear settles excessively lower than front, decrease the number of chain links between lift unit and spring bars. You should be able to get within 1/2 inch both front and rear. Ensure there are always at least 6 links between the lift unit and the spring bar.
Once you have obtained the optimum adjustments, check the following: the pin and clip securing the shank to receiver, the head to shank fasteners, ball nut, coupler latch, lift unit bolts, safety chains, lights and turn signals, and braking system, including breakaway switch if equipped. Test drive the combination. Try to get a feel for how the load feels during normal acceleration, cornering, and braking. It should feel stable under these conditions, with no abnormal bouncing or vague steering feel. If not, see the tips below for some suggestions.
Tips
- Note: For vehicles with air springs, air shocks, or automatic leveling systems, check the vehicle owners manual. Level the vehicle with the vehicle loaded as it will be when towing. Deactivate load leveling system before coupling trailer and adjusting spring bars.
- Remove hitch head from towing vehicle receiver when not towing. This will prevent contamination of head pockets, reduce chance of striking hitch head on driveway ramps or other objects, and minimize damage in event of a rear-end collision.
- If the steering feels light or less responsive during towing, ensure that the rear of the tow vehicle is no more than 1" below the coupled height of the front as measured in step 8. Re-adjust the hitch to obtain the appropriate measurements.
- It may not be possible to get the tow vehicle and trailer perfectly level with respect to each other. If not, favor the front of the trailer to be slightly lower. This will add some tongue weight and provide more clearance at the back of the trailer.
- Before you hitch up, place a little bit of heavy grease in the spring bar pockets and on the hitch ball. This will help prevent excessive wear and rusting of these components.
- Always make sure both the tow vehicle and trailer tires are properly inflated before towing.
Warnings
- Caution: Failure to connect the spring bar chain correctly and provide at least 6 links between lift unit and spring bar can result in damage to the lift unit.
- COUPLED BALL HEIGHT SHOULD NEVER BE GREATER THAN UNCOUPLED BALL HEIGHT. Front wheel overload and loss of rear wheel traction can result. This can lead to unstable handling, reduced braking ability, and a tendency to "jackknife" when turning. This may result in vehicle accident, property damage and personal injury.
- Never exceed the tow vehicles load capacity or tow ratings. Excessive drive train wear and/or loss of control may result.
Items you will need
- Tape measure
- Paper and pencil
- 1/2" torque wrench
- 1 1/4" 1/2" drive socket
- 3/4" 1/2" drive socket
- 1 1/4" box wrench
- 3/4" box wrench
- A level area for tow vehicle and trailer


