Contenu
![]()
Automatic transmission repairs are costly. As one of the most important components in a vehicle, the transmission transfers horsepower evenly to the wheels throughout an engines life. A transmission is secured to the engine using the transmission housing and a cross member that supports the rear of the transmission during operation. Rubber transmission mounts on a cross member can become worn or damaged over time. Worn mounts will cause a transmission to become unaligned and damage the transmission internally. Replace transmission mounts that are cracked, worn, or missing to avoid an internal transmission repair that must be done by the professionals at a huge cost to you.
Step 1
Park the vehicle on a flat, hard surface for lifting. Use a floor jack to raise the vehicle high enough to work underneath easily. Lift the tires at least 3 inches off the floor and suspend the weight of the car or truck onto jack stands that do no retract under pressure. Use two or four jack stands to suspend the vehicle off the floor when work is being done underneath to prevent the weight from slipping off a floor jack, or a floor jack losing pressure and endangering the workers underneath.
Step 2
Center the floor jacks armature under the transmission pan of the transmission. Raise the floor jack until the armature is centered under the transmission pan and some upward pressure has been applied. Lifting the transmission a bit will remove the weight being exerted on the transmission cross member and transmission mounts. Spray the transmission mounts with penetrating oil and allow to soak in for at least five minutes. Use a ratchet and open-end wrenches to loosen the transmission mount bolts. The bolts secure the rubber transmission mounts to the transmission or a transmission bracket.
Step 3
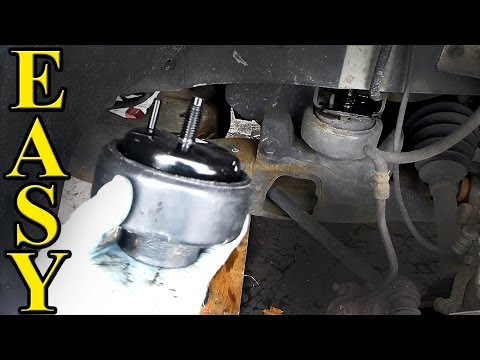
Raise the floor jack until the bolts of the rubber, shock-absorbing mounts can be removed with the mounts. You will find in most cases that a top nut will be loosed and the bolt will drop from the bottom. When the transmission is lifted off the mounts, the old mounts can be removed. Clean the area of the cross member that will receive the new rubber transmission mounts. Use a screwdriver to scrape away any dirt and oxidation that will keep the new transmission mounts from seating flat against the cross member. Use the floor jack to lift the transmission high enough off the cross member to insert the new rubber mounts. These new mounts will stand taller than the old ones because they have not been worn down with the weight of the transmission. Slide the new mounts in place.
Step 4
Insert a transmission mount bolt from the bottom and lower the floor jack until the transmission is seated on top of the rubber shock absorber of the mount. Tighten a mount nut on the bolt and loosely tighten by hand. Repeat the process for the other transmission bolt and hand tighten. Stagger the tightening of the transmission mount bolts so that equal pressure is applied. So not cause the transmission to be twisted during the installation of new transmission mounts or the off alignment will cause internal transmission damage.
Lower the floor jack from under the transmission pan and let the weight of the transmission be suspended by the new rubber transmission mounts. With the new parts the transmission should run smoother and with less noise from underneath. Having been realigned, the transmission will go further with fewer repairs to internal parts.
Tip
- Use anti-seize gel on transmission bolts and fasteners, which can become locked together over time and create hours of extra work in their removal. Using a quality anti seize gel on the threads before tightening will prevent this from happening.
Warning
- Working on your back under a vehicle without protective eyewear puts you at a high risk for eye damage. Dirt, metal, fluids, are all going to fall from a vehicle being repaired. Protect your eyes at all times by wearing safety glasses.
Items you will need
- Floor jack
- Jack stands
- Ratchet wrench
- Open-end wrench
- Screwdriver
- Penetrating oil
- Hammer
- Safety glasses


