
Contenu
- Preparation
- Step 1
- Step 2
- Step 3
- Step 4
- Trim Panels
- Step 1
- Step 2
- Step 3
- Step 4
- Upper Trim Pad
- Step 1
- Step 2
- Step 3
- Step 4
- Step 5
- Step 6
- Items you will need
The dashboard on the Chevy Silverado truck is made up of several trim panels connected to one large upper trim pad. Each smaller panel can be removed individually, though you must remove some of them before you can remove others. Youll need to remove other components as well to detach the main trim pad. The exact types of trim panels and the way to remove them can vary depending on the year of the Silverado.
Preparation
Step 1
Turn the wheels so they face forward and block them, then apply the parking brake and lower the shift lever as far as it will go.
Step 2
Tilt the steering wheel down as far as it will go if the truck has a tilt steering column.
Step 3
Disconnect the negative battery cable.
Step 4
Remove the cover concealing the fuse and relay box, which is located at the left end of the dash at the knee bolster.
Remove the airbag fuse from inside the relay box and wait at least two minutes for the airbag power supply to be deleted.
Trim Panels
Step 1
Grab hold of the instrument cluster bezel and gently pull it out to disconnect it from the retaining clips and remove it from the dash panel.
Step 2
Remove the knee bolsters screws with a screwdriver--the instrument bezel must be removed--and pull the bolster away. Disconnect the airbag electrical connector from the steering column.
Step 3
Detach the center and right side air outlets by pushing the outlets swivel part as far to the left as you can, pushing the rest of the outlet to the left and pulling the outlet out of the dash.
Step 4
Open the glove box, squeeze the compartments sides together and pull the door down so the bumpers clear the stops. Remove the screws at the doors bottom hinge to remove the glove box.
Disconnect the lower sound panel by removing its screws. These are usually located at the right side of the instrument panel.
Upper Trim Pad
Step 1
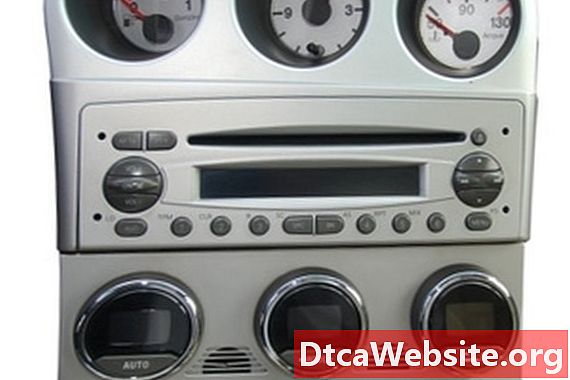
Remove the stereo by squeezing its mounting clips or removing its mounting bolts with a wrench (this depends on the year), pulling it out and disconnecting the antenna lead and electrical connector.
Step 2
Remove the heater/AC control assembly by releasing its retaining tabs, pulling the unit from the dash and disconnecting its electrical connectors and control cables. Remove the instrument cluster by disconnecting its screws and electrical connectors.
Step 3
Detach and remove the center console--remove the screws in the bottom of the console floor, in the cup holder insert, and at the trim panel between the console and instrument panel. These screws may require a hex wrench.
Step 4
Unscrew and remove the lower dash trim panel, which is the panel the glove box was connected to.
Step 5
Insert a pry tool into the holes where the air ducts were and push out the ends of the dashboard grab bar to remove the bar.
Step 6
Pry off the windshields post interior trim strips with a trim tool.
Remove the retaining screws for the upper instrument panel trim pad--they are usually at each end of the panel and in the duct openings-- lift off the trim pad and disconnect all electrical connectors.
Items you will need
- Screwdriver
- Wrench
- Trim stick
- Pry tool
- Wheel blocks


