Contenu
- Step 1
- Step 2
- Step 3
- Step 4
- Step 5
- Step 6
- Step 7
- Step 8
- Step 9
- Step 10
- Step 11
- Step 12
- Step 13
- Step 14
- Tips
- Items you will need
Four wire trailer light connectors the typical type of connection used for pulling small to medium boat trailers and small utility trailers. This installation is designed to for most trailer connector four wiring situations. See tips for vehicles which may have a five wire tail light system. The installation should take less than one hour.
Step 1
Find the tail light wiring harness, which is typically inside trunk near the back bumper.
Step 2
Locate a suitable location for the harness clamp for the four wire trailer light connector and harness underneath the back bumper area. Drill a 1/8 inch hole in the car frame near this location and attach the wiring harness clamp for the light connector with a sheet metal screw.
Step 3
Leave about 6 inches of the end wiring harness with connector hanging loose from the wiring harness clamp.
Step 4
Drill a 1/2 inch hole in the bottom of the trunk near the location the four trailer light wiring harness will be connected to the tail light wiring harness.
Step 5
Push the other end (not the connector end) of the wiring harness through the 1/2 inch hole into the trunk.
Step 6
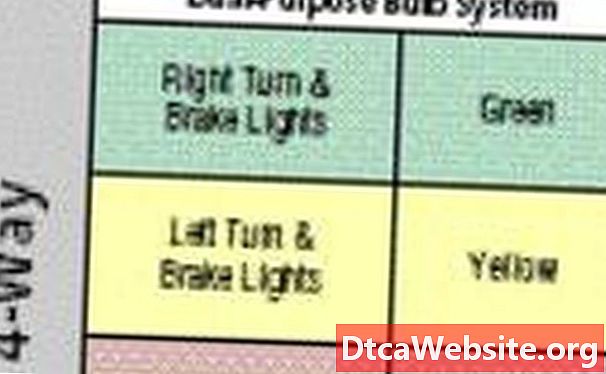
Find the green wire in the tail light wiring harness for the right side, stop, and turn light. Use a wire splice to attach the green wire from the four wire trailer light connector harness to the green tail light wire.
Step 7
Find the yellow wire in the tail light wiring harness for the left side, stop, and turn light. Use a wire splice to attach the yellow wire from the four wire trailer light connector harness to the yellow tail light wire.
Step 8
Find the brown wire in the tail light wiring harness for the tail, license, and marker lights. Use a wire splice to attach the brown wire from the four wire trailer light connector harness to the brown tail light wire.
Step 9
Drill a 1/8 inch hole in an exposed section of the metal frame inside the trunk. Use sandpaper to sand the metal within about 1/2 inch of the 1/8 inch hole. Sand until all paint and other materials are removed and only shiny metal remains. Attach the white wire from the four wire trailer light harness.
Step 10
Attach the white wire, ground wire, to the 1/8 inch hole with a sheet metal screw.
Step 11
Test the wiring connections by turning on the head lights. Clip the ground side of test light to the ground wire connection screw.
Step 12
Stick the pointed end of the test light into the green wire of the four wire trailer light harness. If the light on the test light turns on the connection is good. Turn off the head lights.
Step 13
Turn on the right side turn signal, if the test light blinks the connection is good. Have someone step on the vehicle brake pedal, if the test light comes on the connection is good.
Step 14
Repeat the last two steps for the left side using the yellow wire of the four wire trailer light harness.
Seal the 1/2 inch hole in the trunk with silicone to keep water out. Cover the ground connection (white wire) to the frame with silicone to avoid rusting.
Tips
- Ensure none of the wires rub against the metal edge of the 1/2 inch hole drilled in trunk.
- If any lights do not work properly, check your connections.
- Do not seal anything with silicone until the wiring is completed, to avoid scraping away silicone which is messy.
- Some vehicles have a 5-wire system and you need to purchase a trailer light converter that adapts the trailers 4-wire system to the vehicles wiring system. The converter is available at most auto parts stores. The converter comes with a wiring diagram.
Items you will need
- 4 Wire Trailer Light Connector and Harness
- 12 VDC Test Light
- Drill
- 1/8 inch Drill Bit
- 1/2 inch Drill Bit
- Tube of Silicone
- 1/8 inch Sheet Metal Screws
- Screwdriver
- Wire Cutter/Stripper
- Wire Splices
- Sandpaper


