
Contenu
Travel trailers typically have two separate electrical systems: a 120-volt system for use when hooked up to a grid and a 12-volt system for remote camping. The electrical outlets for the two systems are entirely different. A 120-volt outlet is the same as the outlets used in traditional buildings, while a 12-volt outlet is similar to the cigar lighters familiar from the dashboards of cars. The installation of the two outlet styles is carried out in equally different ways.
Step 1
Decide on a location and rating for the 120-volt outlet. If the location is to be in an area subject to high levels of moisture, the outlet should be of the Ground Fault Circuit Interrupter, or GFCI, type; otherwise, use a tradition duplex outlet. The outlet must be rated to its intended purpose; for typical domestic duties, a 15-amp outlet is normal.
Step 2
Install the receiver according to the manufacturers instructions. First, determine which receiver style will best suit the location. The receiver can be of a type designed to rebate into a hollow wall so that the outlet is flush, or the receiver can mount on the wall so that the outlet protrudes. The projection is typically less than two inches from flush.
Step 3
Turn off the 120-volt power to the travel trailer; ensure the shore connection cord is not plugged into an outlet and the generator is switched off. Run a three-conductor wire to the location of the outlet, and connect it to a vacant circuit breaker in the 120-volt breaker board rated to its intended purpose; for typical domestic duties, a 15-amp breaker is normal.
Step 4
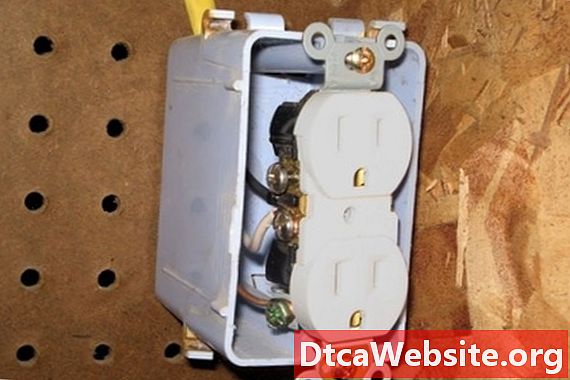
Connect the three conductors to the terminals specified by embossed labels cast into the back of the outlet; typically, the hot wire attaches to a copper-colored screw, the neutral wire attaches to a silver-colored screw and the ground wire attaches to a green-colored screw. Secure the outlet to the receiver and reinstate the power supply.
Fix a 12-volt outlet to a wall or the underside of a shelf according to the manufacturers instructions. Route the two-conductor wire attached to the outlet to the 12-volt fuse board of the travel trailer, and attach the black or red wire to the bus bar serving the other outlets. Attach the white wire to the bus bar serving to ground all the travel trailers 12-volt circuits.
Tip
- Use a stud finder to ensure no wires, pipes, lateral support rails or support hoops are present in the wall at the desired location before beginning to cut the hole for a rebated 120-volt outlet receiver.
Warning
- Do not attach the supply to a 12-volt outlet to the bus bar serving the lights or the water pump.
Items you will need
- Outlet
- Wire
- Electrical toolkit


