Contenu
The Toyota Tacoma clutch operates using a closed hydraulic system. If this system is opened for any reason, air can enter and the clutch will not function correctly. This can happen as a result of a low fluid level in the system or when yo remove a part of the system. If this occurs, you must replace the lost hydraulic fluid and bleed the air from the system.
Step 1
Raise the vehicles hood and locate the clutch master cylinder. Ensure that it is filled to the indicated line on the container. If not, open the cylinder and fill it with approved DOT 3 hydraulic fluid. Check your vehicles owners manual for the exact specifications. Close the container.
Step 2
Raise the vehicle to gain easy access to the vehicles undercarriage. Use a hydraulic lift if available. If no lift is available, use a jack to raise the front of the vehicle. Use jack stands to support the vehicle. Ensure this is done correctly to avoid serious injury. If necessary, this step can be skipped, but the task will be more difficult.
Step 3
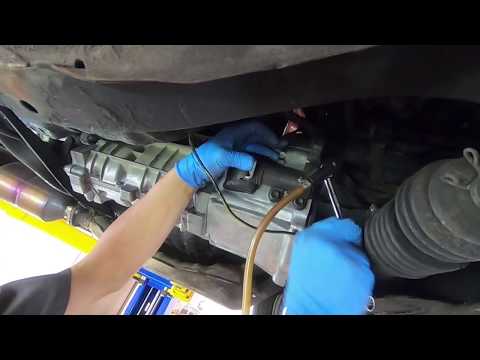
Locate the clutch housing underneath the vehicle. This is a large, cone shaped assembly locate along the vehicles mid-line, approximately even with the front wheels. Find the release cylinder, located on the left side of the clutch housing. Locate the bleeder valve on the left side of the release cylinder. Remove the dust cap. Place one end of the plastic tubing over the valve and the other end of the tube in the bottle. Make sure there is enough clean hydraulic fluid in the bottle to keep the end of the tube submerged.
Step 4
Direct your assistant to slowly depress the clutch pedal. Open the bleeder valve using a wrench to turn the valve counter-clockwise until fluid begins to flow through the tube. When your assistant indicates that the clutch pedal is fully depressed, close the valve by turning it clockwise until hand-tight.
Step 5
Repeat step four. Continue to repeat the step until there is no more air in the system. This is indicated by the absence of air coming from the bleeder valve. Watch for bubbles in the fluid to indicate air. During the process, periodically check the fluid level in the clutch master cylinder to make sure it doesnt fall too low. If it does, air will enter the system and you will have to repeat the bleeding process.
Replace the dust cap on the bleeder valve after all air is remover.
Tip
- Clean the clutch master cylinder using a damp cloth before opening it to prevent contamination.
Warnings
- Ensure the vehicle is securely supported before getting underneath it to avoid injury or death.
- Do not use hydraulic fluid that has been opened. Water can get into the fluid making it ineffective.
- Make sure you use the proper type of fluid as indicated by your vehicles owners manual.
- Ensure the clutch is working correctly before driving the vehicle.
Items you will need
- New DOT 3 Hydraulic (brake) fluid approved for use on your vehicle
- approximately one foot of 1/4 inch plastic tubing
- small container such as an empty water or soda bottle
- jack stands or an automotive lift
- assistant


